

No snoopers, please
I don’t much care for the idea of cyberspace strangers looking at my house. Or knowing where my house is, or even knowing that I have a house. I mean my neighbors know I live there and I’m cool with that. Truth is, it’s a small town, a lot of people know how to find me.
You know, it’s not like I’m trying to hide; except from all those random freaks on the Internet. But seriously, those bad actors with their bad intentions; random hackers in distant states and foreign lands. The robots and objectionables have no need to know.
In my view, the best policy is to not even leave a porch light on. Nothing to attract the attention of thieves or script kiddies. There should be only a single securely locked door, set back in a dark corner known only to me.
I like mine self-contained and unexposed.
Oh, and absolutely no reliance on third-party services. I love the idea of a smart house; exposing house systems to the outside world, not so much. I like mine self-contained and unexposed.
…just don’t lock myself out
The caveat of course, is that we all want to have access to our house systems while we’re away. The paradox of having a door is that while providing access for family, we want to keep the vagabonds at bay. I considered a number of different options because there are a lot of ways to get this done.
A little research revealed there is clearly no such thing as a single ideal/perfect solution, nor does everyone share the same set of requirements. But I had to start somewhere; my thinking went something like this:
- keep it simple – My requirements are fairly narrow which drove all my thinking. Intentionally leaning away from more complex solutions and more towards constraint is a great place to start
- no firewall pinholes – There are good arguments to be made for building your own on-premises whole-house firewall and gateway router. Which is not a bad idea if you’re a true geek; however you really need to know what you are doing. Therefore I would not typically recommend it. Avoiding any changes here means less juggling required, another plus
- end-to-end encryption – This is personal stuff. No network engineer, co-worker, or coffee shop lurker needs to know my business or look at my cameras
- restrict access to a set of known keys – I despise passwords. Preferring to just hand out keys and shared secrets, keeping it clean. Most likely, only you and your significant other will require external access
- fewest pieces, easiest configuration – What can I say? I’m lazy and always looking for the easy out. The less there is to touch, the better. The simpler the configuration, even better yet
- low maintenance – Ideally, set it up and forget it. This is the low-level infrastructure. It should require the barest minimum of administrative burden. I don’t even want to have to think about it
That doesn’t sound like too much to ask for, does it? Fortunately, along about this same time I met and fell in love with WireGuard. I can happily confirm that all of the above was easier to pull off than anticipated.
A few basic assumptions
Based upon the premise that Internet access is provided by a typical home or small office consumer broadband service (i.e. cable, fiber, wireless, digital). The sample topology sketched below is supported by a few assumptions:

Basic Underlying Assumptions
- No changes to the ISP appliance
- All IoT devices and supporting systems are connected to a wired network segment that is physically separate from everything else
- No routing between the Private LAN and the Hidden LAN
- The only route in and out of the Hidden LAN is through an encrypted tunnel to a cloud endpoint
Most home Internet services come with an appliance providing a private local area network over both WiFi and Ethernet. This box serves as a firewall and gateway router; providing network address translation between internal private addresses and the public-facing address of the appliance.
Access points like these are normally setup so that all inbound connections are dropped, making your house appear to a scanner like a dead address. Snoopers should only give your place a quick sniff before moving on to the next.
I see no need for alterations to house Internet access. It can always be swapped out for new service, replaced, or upgraded as desired.
Some cabling is required…
The network architecture is a key part of the security design. All of the IoT stuff will hang off a separate network segment isolated from the rest of the house. Some cabling is required to make this work, no surprise there. Just remember to use separate switches for each network segment and do not allow anything to cross over.
Network segmentation
A traditional best practice, segmentation severely restricts the incoming attack vector for key house systems. The only node that sits in both networks is the inner bastion. A network guardian containing separate interfaces and physical connections that are paired with firewall restrictions between each path.
If you have the hardware to support it, a VLAN could be deployed as an alternative solution to this same problem.
Consumer devices and guest connections on the primary house network are not allowed to mingle with internal house systems.
You may have noticed a lack of WiFi on the internal (hidden) network. I am not a big fan. While super convenient, by allowing security drones and handhelds to be mobile, and extending the reach of your network, it exposes a vulnerability if vision is a part of your security design.
You may have noticed a lack of WiFi…
Before even coming within view of the cameras, a thief with a deauther in their pocket could easily take down all the WiFi communications. Since the cameras are all in our control, they are unlikely to be fooled into connecting with an evil twin. However, they would still be vulnerable and useless for security purposes during such a denial-of-service attack.
Even more to the point, cameras need a power source. By using Power over Ethernet we gain convenience, while benefiting from the added integrity and speed of the wired connection.
Just two key pieces
Although there are a handful of different things to install and configure with regard to network control, only two servers need any special attention.
- Cloud-based virtual private server
- Inner bastion
Afterwards, adding new devices to the internal network will be as easy as pie. Everything should connect right out of the box with no mental gymnastics required.
Cloud VPS
A virtual private server is a key part for our solution. It gives us a static public address in the cloud that we can install software on. These are easy to come by and are not expensive. Shop around as reputations vary. You can pay as little as $5 (or less) monthly.
For an optional step I would suggest going to a registrar, picking out a domain for yourself, and naming your new server. This can be more convenient and less prone to error than having to remember a numeric IP address. Also not expensive.
Setups for the cloud server
I went with CentOS for an operating system on mine.
<SIDETRIP> I still have a soft spot in my heart for Red Hat. It was my platform of choice for a side project back in the late 1990s while building a small town ISP with some friends. Had lots of fun with static and dynamic websites, shopping carts, virtual hosting, wide area networking, dial-up access over telephone lines, user and email management, that sort of thing. </SIDETRIP>
Not much to install here, WireGuard and NGINX are the two main pieces needed to make this part of it work. My server came with basic firewall rules in place and access by secure shell (SSH) already up and running.
- Using firewall-cmd for packet filtering
- WireGuard configuration
- NGINX configuration

The “House” in this example, is the inner bastion. For both endpoints the cloud server is the default network gateway. Not only is all traffic private and encrypted end-to-end between phone and house, the VPS also serves as our exit-door into the public Internet.
Optionally, for any temptation to employ NGINX for public-facing services, full TLS encryption for any traffic outside the tunnel should also be included.
One easy solution for that is to use Let’s Encrypt to configure the server certificate. Please note you will need a domain name since these folks do not currently issue certificates to numeric addresses. Otherwise, you can pay a commercial certificate authority to have encryption on just a bare IP address.
Words of Caution
- This post does not delve into every nitty-gritty installation and setup detail
- Assumes servers are up and running with software installed
- Our focus here is only on the additional configuration needed to implement our solution
Basic hardening
Refer to hardening guidelines for your platform. You should certainly restrict root logins over SSH, setup a basic user account with a complex password as a sudoer, lock down your firewall, probably install fail2ban, and perhaps a few other things such as Tripwire or AIDE. Try to resist the temptation of cutting too many corners.
Enable forwarding
This server will also be a NAT router and gateway for the peer connections. Packet forwarding must be activated in the Linux kernel.
Just create a file /etc/sysctl.d/wireguard.conf with the following content:
net.ipv4.ip_forward=1
net.ipv6.conf.all.forwarding=1
Yes, the name is a bit off-base. However in my defense, I was in a WireGuard state of mind at the time. Apply it now with this command:
# sysctl -p /etc/sysctl.d/wireguard.conffirewall-cmd
On my CentOS box, it came already installed and setup, needing only minor tweaking. Incoming connections were locked down, with SSH as the only public service.
A service definition is required to accept incoming WireGuard connections on the public address. Add a configuration file with the following content to define a port to use:
/etc/firewalld/services/wireguard.xml
<?xml version="1.0" encoding="utf-8"?>
<service>
  <short>wireguard</short>
  <description>WireGuard</description>
  <port protocol="udp" port="54321"/>
</service>
Only a few new rules are needed to pull this off and the following commands should do the trick. The first two rules allow NGINX to function as a public web server (if wanted). Accepting incoming WireGuard connections is a definite requirement. Due to the fact that all traffic over that interface is considered to be trusted, everything coming through wg0 is in the friend zone.
# firewall-cmd --add-service=http --zone=public --permanent
# firewall-cmd --add-service=https --zone=public --permanent
# firewall-cmd --add-service=wireguard --zone=public --permanent
# firewall-cmd --add-interface=wg0 --zone=trusted --permanent
# firewall-cmd --reload
This could probably be tightened down a little more by applying port and address restrictions on the tunnels, but this is easy and workable. Implicit trust can be assumed when connecting over WireGuard as only selected devices are permitted.
WireGuard
As I write this, WireGuard has just been merged into the Linux kernel sources and will soon no longer require a separate install. There are lots of great guides with setup details. The focus here, is directed on just the essentials for our specific example.
Rather than designing a complete VPN, only a couple of encrypted tunnels are actually required. One leg from the house to the cloud server and another leg running between a phone and the cloud server. More constraint equals much less complexity.
Once installed, generate the three public/private key pairs for each node: the cloud server, the inner bastion, and the handheld. Refer to the guides mentioned above for all the details.
The wg-quick utility simplifies life here, just rig the configuration of the wg0 interface with the following file. Substitute your key values and adjust addressing to suit.
/etc/wireguard/wg0.conf
[Interface]
Address = 10.0.0.1/24, fc00:23:5::1/64
ListenPort = 54321
PrivateKey = xP8Ef7EHaByCiPQP3zJ41W8rYXKSMXkv6iXYJs5b29=
PreUp = iptables -t nat -A POSTROUTING -s 10.0.0.0/24  -o eth0 -j MASQUERADE; ip6tables -t nat -A POSTROUTING -s fc00:23:5::/64 -o eth0 -j MASQUERADE
PostDown = iptables -t nat -D POSTROUTING -s 10.0.0.0/24  -o eth0 -j MASQUERADE; ip6tables -t nat -D POSTROUTING -s fc00:23:5::/64 -o eth0 -j MASQUERADE

# House Gateway
[Peer]
PublicKey = J42MFDH1uSM9Lm0S2+eJ7LwL/9mJ8fkQpJCY6rDE631=
AllowedIPs = 10.0.0.2/32, fc00:23:5::2/128

# Android Phone
[Peer]
PublicKey = qEjzlDXbUdsHs7Hi7IufvxcBy/4+/XSA8tlMQpbFFk6=
AllowedIPs = 10.0.0.3/32, fc00:23:5::3/128
Note that the ListenPort matches the firewall opening. The PreUp and PostDown lines configure NAT routing for peer connections out through eth0, the public interface.
Only two peers are allowed to connect, the house and a phone. Each is associated with a specific private address and public key. Both peers are considered to be roaming, without a predefined endpoint. This is true not only for the phone but also for the home gateway. Your home service is also “roaming”, it must periodically request a new public address due to either lease expiration or because the power was cycled on the device.
Feel free to add as many additional phones as desired, assigning address numbers from the very memorable 10.0.0.0/24 subnet selected for the example. It stands out visually and is probably a safe general choice to use for this; especially if you have more than one house. Though any private network will work.
Don’t forget to generate a private key for each mobile device and include the corresponding public key in the configuration above.
Start the interface, and make it available on server restart:
# wg-quick up wg0
# systemctl enable wg-quick@wg0.service
NGINX reverse proxy
Although not the only way to implement a reverse proxy, NGINX is a great fit for the task at hand; and for me, an opportunity to learn something new.
We are using openHAB as a home automation server. An out of the box setup includes access by HTTP already working; it responds to requests at http://openhab:8080/
The configuration for this is simple…
http {
   # ...
   server {
        listen 8080;
        location / {
           allow 10.0.0.0/24;
           deny all;
           proxy_pass http://10.0.0.2:8080/;
        }
   }
}
…because it simply pushes port 8080 all the way through. Since that port is only available to trusted connections, it will only respond to requests coming through the tunnel.
Indulging in an extra dose of paranoia, address restrictions on the location in the NGINX configuration are also included. In this particular case, it is simply a restatement of the only network segment actually allowed to open the connection.
You do not have to use the same port number. Another possibility would be accepting connections on the default port 80, then remapping the destination onto port 8080 coming from NGINX or within the packet filtering on the inner bastion itself. Doing so would allow you to ignore the port number when specifying the address on the phones.
…no TLS layered onto this connection.
What, no HTTPS?! You may have noticed that there is no TLS layered onto this connection. It is intentionally omitted for simplicity and in recognition that it doesn’t add much to the solution.
Communications are already running through an encrypted tunnel from one end to the other. Piling on an additional helping of cryptography just for those last few inches only seems to buy us some additional overhead and increased complexity.

That and I’m lazy.
The trade-off here is that traffic flows in plain text between the inner bastion and the openHAB server. I judge the risk as low. However if you feel the hairs on the back of your neck standing up over this, feel free to pile on enough additional layers to bring on that warm cozy feeling.
All that should really be required, is to get server certificates in place; then use HTTPS all the way through to https://openhab:8443/
Inner Bastion
Here is the other key piece of the puzzle. This example uses the following for a server:
- Raspberry Pi 4 Model B, 1GB of RAM
- added a USB Ethernet dongle for the second interface
- using Raspbian Buster Lite for the operating system
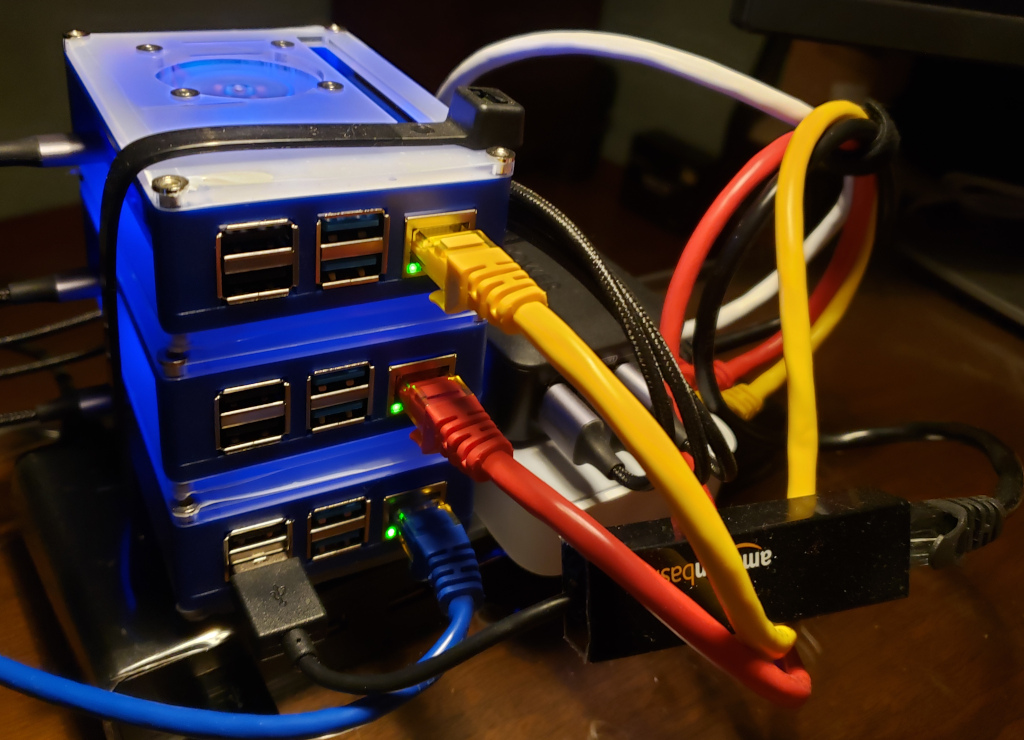
This server has two physical network connections and lives in both house networks. The original proof of concept can be seen on the bottom of the pile in the photograph below. The blue cable (eth0) is jacked into the main house network. The black cable (eth1) is running out of a USB interface, our conduit in and out of the hidden (internal) network.
So what does it do?
Primary role of the bastion host is to be a troll under the bridge challenging all traffic between the two house networks. In order to keep life simple, we will also task it with providing a basic set of services to systems on the internal network allowing each attached device to self-configure.
The Role Of The Inner Bastion
- Restrict access between main house network and internal systems
- Provide dynamic configuration services for systems on the internal network
- Name server for internal network
- Gateway router for internal network
- Has encrypted tunnel to cloud server
- Forward inbound traffic from cloud endpoint to the home automation server
Setups
Beginning with an out-of-the-box Raspbian Buster Lite image, here are the four essentials for provisioning this little bastion. It also becomes the initial definition and system number one of the internal network.
- Define interface for internal network
- dnsmasq for DHCP and DNS on internal network
- iptables for firewall rules
- WireGuard for encrypted tunnel
A prerequisite for defining the second interface is to select an addressing scheme. The network numbering selected must be different than whatever is allocated by the house LAN.
Don’t worry, just follow along for a tutorial and explanation of each step of the process.
Rig for two interfaces
For starters, plug the Raspberry Pi into the main house network using a cable jacked into the Ethernet interface. It will dynamically request an address and perform network configuration.
Using a console session or connected from another system via secure shell, enter the ip route command to retrieve the current network routing table.
$ ip route
default via 192.168.0.1 dev eth0 proto dhcp src 192.168.0.17 metric 202
192.168.0.0/24 dev eth0 proto dhcp scope link src 192.168.0.17 metric 202
Based on that second line of the response, the eth0 interface is connected to the 192.168.0.0/24 private network. Used often, it seems to be a popular network. Really it could be anything, better not to make any assumptions, so always check to be certain.
…not only old school, but convenient and simple
The internal network must be different. Since those Class C allocations are not only old school, but convenient and simple, pick another one. There are 256 of them, each supporting 254 unique device addresses; 192.168.10.0/24 was selected for this example.
Traditionally the highest address is used for the router on a network. With a bow to tradition, add the following two lines to /etc/dhcpcd.conf, defining the address and network for eth1.
interface eth1
static ip_address=192.168.10.254/24
If your fear is that you’ll need more than 253 devices on the internal network which will require services via TCP/IP, you can always get creative with CIDR allocations and carve out any size block from the private reserve that suits your fancy.
Packet forwarding must be enabled in the Linux kernel. Here just edit the file /etc/sysctl.conf and uncomment (remove the leading # character) from the two lines highlighted below.
# Uncomment the next line to enable packet forwarding for IPv4
net.ipv4.ip_forward=1

# Uncomment the next line to enable packet forwarding for IPv6
#  Enabling this option disables Stateless Address Autoconfiguration
#  based on Router Advertisements for this host
net.ipv6.conf.all.forwarding=1
Now is a really good time for a reboot. If not already connected, make sure the USB Ethernet dongle for the second interface is plugged in before doing so.
Verify both interfaces are up with intended addressing on the internal net. Another ip route command should reveal the truth.
 $ ip route
default via 192.168.0.1 dev eth0 proto dhcp src 192.168.0.17 metric 202
192.168.0.0/24 dev eth0 proto dhcp scope link src 192.168.0.17 metric 202
192.168.10.0/24 dev eth1 proto dhcp scope link src 192.168.10.254 metric 204
The openHAB server is a key puzzle piece
A quick sidebar for an important point. The openHAB server must have a static address; allowing for an explicit forwarding rule later.
interface eth0
static ip_address=192.168.10.1/24
static routers=192.168.10.254
static domain_name_servers=192.168.10.254
Reserve the first address on the network. Connect to the openHAB server, and update /etc/dhcpcd.conf by adding the lines above. Then initiate a shutdown and restart.
Because forwarding to host name references is a potential security risk only numeric address destinations should be used in the filtering rules.
dnsmasq
A couple of main ingredients in the alphabet soup of TCP/IP network configuration are DHCP and DNS – both services must be provided to the internal network.
What for?
- DHCP distribute dynamic address and configuration settings to connected systems
- DNS provide forwarding / caching for global name services, and resolving locally administered network names
A nice solution for small projects is to use dnsmsaq as a substitute for both dhcpd and named.
Though not part of the standard distribution, add it in now with the following command: sudo apt-get install dnsmasq
Not much to configure. Just specify the range of address numbers to hand out over DHCP. Although managed by our firewall rules later, a restriction to only the eth1 interface is included here.
/etc/dnsmasq.conf
# ...

# If you want dnsmasq to listen for DHCP and DNS requests only on
# specified interfaces (and the loopback) give the name of the
# interface (eg eth0) here.
# Repeat the line for more than one interface.
interface=eth1

# ...

# Uncomment this to enable the integrated DHCP server, you need
# to supply the range of addresses available for lease and optionally
# a lease time. If you have more than one network, you will need to
# repeat this for each network on which you want to supply DHCP
# service.
dhcp-range=192.168.10.100,192.168.10.253,12h

# ...
The highlighted line above indicates the network addresses from 100 through 253 are available for dynamic allocation with a 12-hour lease; thus the numbers 1-99 and 254 are reserved for static assignment.
Record statically assigned host names in /etc/hosts
192.168.10.1    openhab
192.168.10.254  steelgate
Configure for a local name server /etc/resolvconf.conf
# Configuration for resolvconf(8)
# See resolvconf.conf(5) for details

resolv_conf=/etc/resolv.conf
# If you run a local name server, you should uncomment the below line and
# configure your subscribers configuration files below.
name_servers=127.0.0.1

# Mirror the Debian package defaults for the below resolvers
# so that resolvconf integrates seemlessly.
dnsmasq_resolv=/var/run/dnsmasq/resolv.conf
pdnsd_conf=/etc/pdnsd.conf
unbound_conf=/var/cache/unbound/resolvconf_resolvers.conf
Get this refreshed now…
$ sudo resolvconf -u
$ sudo /etc/init.d/dnsmasq restart
iptables
Due to physical infrastructure, our inter-network fortification has no direct exposure to the public Internet alleviating a lot of worry. That said, make sure to implement appropriate firewall rules so the bastion host lives up to its name.
It is important to realize you may not have full control over devices connected to the main house network. There is a significant probability that one or more these gadgets might be compromised.
The Raspbian Buster Lite image provides iptables installed and ready, with everything open and permissible. Since there is no fancy firewall administration package included, I elected to document how this would be directly configured.
Add a couple of new files…
/etc/network/if-pre-up.d/iptables
Fabricate this script to execute iptables-restore before any interfaces are started. It loads in a file described below prescribing our desired remedy in an iptables-save dump format. Don’t forget to throw a chmod +x at this one to make it executable.
#!/bin/sh
/sbin/iptables-restore < /etc/network/iptables
/etc/network/iptables
The packet filtering rules documented here go hand-in-hand with the WireGuard configuration to follow after; it references the wg0 interface and associated private addressing.
Not even gonna try to turn you into an iptables expert. Instead, just provided the complete definition along with embedded comments to document the necessary rules.
*nat
:PREROUTING ACCEPT [0:0]
:INPUT ACCEPT [0:0]
:OUTPUT ACCEPT [0:0]
:POSTROUTING ACCEPT [0:0]

# use NAT for pinhole and everything outbound via tunnel
-A POSTROUTING -s 10.0.0.1/32 -o eth1 -j MASQUERADE
-A POSTROUTING -o wg0 -j MASQUERADE

# this is the inbound NAT pinhole from the cloud server to openHAB
-A PREROUTING -i wg0 -p tcp --dport 8080 -m conntrack --ctstate NEW -j DNAT --to-destination 192.168.10.1:8080
-A PREROUTING -m conntrack --ctstate ESTABLISHED,RELATED -j ACCEPT

COMMIT

*filter
:INPUT ACCEPT [0:0]
:FORWARD ACCEPT [0:0]
:OUTPUT ACCEPT [0:0]

# accept ICMP, loopback, established connections
-A INPUT -s 127.0.0.0/8 -d 127.0.0.0/8 -i lo -j ACCEPT
-A INPUT -p icmp -j ACCEPT
-A INPUT -m state --state ESTABLISHED -j ACCEPT

# -------------- Service Definitions ----------------

# accept SSH,DHCP,DNS,mDNS from internal network
-A INPUT -i eth1 -p tcp --dport 22 -j ACCEPT
-A INPUT -i eth1 -p udp --dport 67:68 -j ACCEPT
-A INPUT -i eth1 -p tcp --dport 53 -j ACCEPT
-A INPUT -i eth1 -p udp --dport 53 -j ACCEPT
-A INPUT -i eth1 -p udp --dport 5353 -j ACCEPT

# accept SSH connections from cloud server
-A INPUT -i wg0 -s 10.0.0.1/32 -p tcp --dport 22 -j ACCEPT

# drop all other inbound traffic
-A INPUT -j DROP

# --------------- Forwarding Rules ----------------
-A FORWARD -m conntrack --ctstate RELATED,ESTABLISHED -j ACCEPT

# allow forwarding from internal network through the tunnel
-A FORWARD -i eth1 -o wg0 -j ACCEPT

# allow forwarding on port 8080 to openHAB
-A FORWARD -p tcp -d 192.168.10.1 --dport 8080 -j ACCEPT

# drop all other forwarded traffic
-A FORWARD -j DROP

COMMIT
Command to activate: sudo /etc/network/if-pre-up.d/iptables
nftables will soon replace iptables
As the future direction of Linux distribution development is to replace iptables with nftables, a revision to the above will be needed. Requirements and policies laid out remain the same regardless. The new utility includes a revised command structure, thus changing how rules are specified.
WireGuard
Install with sudo apt-get install wireguard
Again, the wg-quick utility makes it easy. After installing WireGuard, define the wg0 interface with the file below.
/etc/wireguard/wg0.conf
[Interface]
PrivateKey = aJf+ewT3XDGrlqlB9BOpD7Y02U+F11zaTBvrrEE8okU=
Address = 10.0.0.2/24, fc00:23:5::2/64
DNS = 9.9.9.9, 149.112.112.112

[Peer]
PublicKey = K002qggZTOeB+G+KyrMfl4tfYNNNtrbxSPxUZCyBAH0=
Endpoint = 208.217.112.65:54321
AllowedIPs = 0.0.0.0/0, ::/0
PersistentKeepalive = 25
Supply your key values and addressing. I have Quad9 configured in this example, however you can use whatever DNS you’re comfy with.
Based on the AllowedIPs line, this interface becomes the default route. Now everything, including all outbound and forwarded traffic, is sent through the tunnel. The cloud server is now our exclusive gateway to the whole wide world beyond it.
Enter the following commands to fire this up and make it a permanent thing:
$ sudo wg-quick up wg0
$ sudo systemctl enable wg-quick@wg0
Postscript
That is all there is to it. Gives me everything I wanted. Works great too. Has been solid, reliable, and fast.
Soft spots
Internal house systems are allowed to make connections to the public Internet. Providing this opening simplifies such things as software updates and access to external services.
About the deal with the devil you just signed? Sure, I get that you had to appease your lust over that shiny new appliance… but do you truly understand what cloud-based shenanigans it might be engaged in? For me, my beer stash is my business. But that is on you. I can’t help you with any questionable choices.
Is my refrigerator part of a criminal botnet?
Before long, you start eyeing all your appliances with one brow raised. Is my refrigerator part of a criminal botnet? Perhaps running dark web underworld errands in its spare time?
For all the zealots out there, this security hole could be closed off. Building a tightly-controlled caching server for distributing software updates internally, and at the very least, supplying an in-house time server. Oh, and adopting a just say no attitude towards third-party services. Likely easier said than done.
Regardless of whether or not you consider yourself a professional / do-it-yourself wizard / tech junkie / tinkerer / maker / armchair expert …the sky is the limit on what you can accomplish.
And you can do it securely.
Your encrypted phone
I’ve tested the complete end-to-end tunnel and bounce using a WireGuard connection from both an Android phone and a Windows notebook. For both of these, just used a setup identical to the inner bastion.
Works just like you think it would; easy peasy lemon squeezy. Jump in and out at will, with minimal delay. Just insure you are connected before attempting to access house systems.
easy peasy lemon squeezy
A nice feature of this particular configuration is whenever you’re connected to the encrypted tunnel, all Internet traffic for your personal device is running through it. Completely protecting your communications from local eavesdroppers and obscuring your true location in the world.
I leave mine up almost all the time. The price to pay for such a policy is a steady power drain due to the overhead, resulting in a noticeable reduction to battery life. Something to consider.
An all-encryption-all-the-time protocol is most appropriate when connected to networks shared with many people. Examples include those encountered at hotels, your workplace, coffee shops, train station, retail stores and restaurants, and etc.
Stay safe out there.